
Recording a Simple Macro to save yourself Repetitive Work
The whole area of macros in Excel can be an intimidating area to start with but some things can be very straightforward. I thought it would be useful to publish some useful tips on our blog to give you a taste of what is contained in our online courses should you wish to take your knowledge further. Feel free to leave a comment if you have any questions or indeed tips.
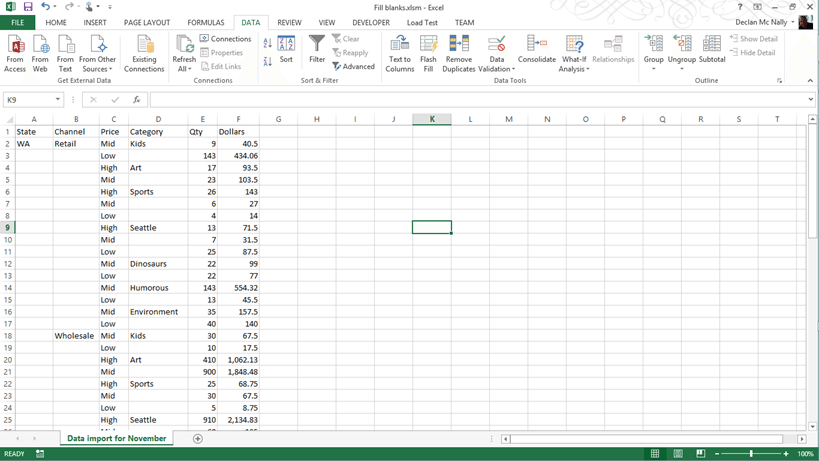
So where do we start? I wanted to show you how to record a simple macro but also give you something useful. I have quite often found that I have had to import data into Excel from text files whether they be comma delimited, fixed width or more recently XML. A lot of the time after this import I am left with gaps in the data. An example will make this clearer. Below you can see an Excel workbook after some data has been imported. This was imported from a text file that was designed to be easily readable but this has left gaps in the data so for data analysis it is useless.
So how are we going to fill in the gaps and at the same time how can we automate this?
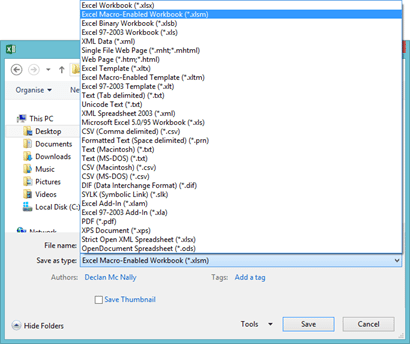
Save as a Macro-Enabled Workbook
The first thing we need to do is to save the workbook as a Macro-Enabled workbook. To do this we choose Save As and select the appropriate setting as you can see below:
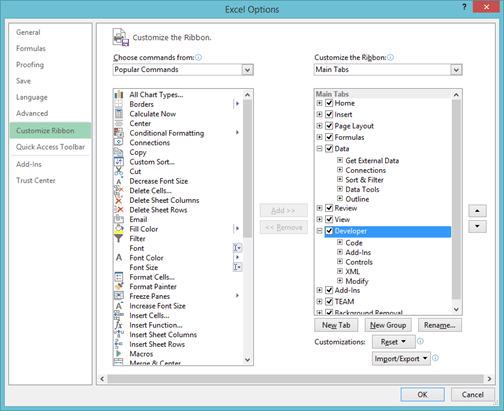
Showing the Developer Tab on the Ribbon
In order to get to the tools required for working with macros we need to show the Developer tab on the ribbon. This is not shown by default. To do this you need to navigate to the backstage (or as I like to call it the File tab) and choose Options. You will need to tick the Developer tab (shown below) and once you click OK you will see this new tab on the ribbon.
Recording a macro
My advice when recording a macro is to practice what you want to do first, do not just jump in. Once you can do it without mistakes then that is the time to start recording. In order to start recording you click on the Record Macro button on the Developer tab on the ribbon shown below:

Selecting this presents us with a number of options:
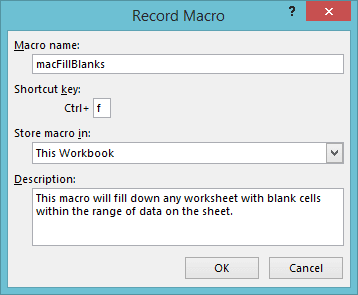
I have filled out the above with my choices. The name cannot contain blanks and I follow the convention of placing the prefix ‘mac’ before all my recorded macro names. The shortcut key is optional. I will normally store my macros in the current workbook but I could choose the Personal Macro Workbook if I wanted to be able to use this macro in multiple workbooks but for now that is not important. Finally a description is always useful if someone else needs to maintain the macros.
Once we click OK everything we do within Excel is recorded!
Filling in Blank Cells
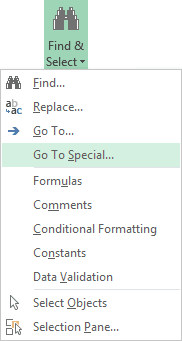
Most of the functionality you need is available in the Go To Special window. To get to this window you will start at the Home tab on the ribbon and then click on the Find & Select dropdown and you will see Go To Special… on the menu. You can see this below:
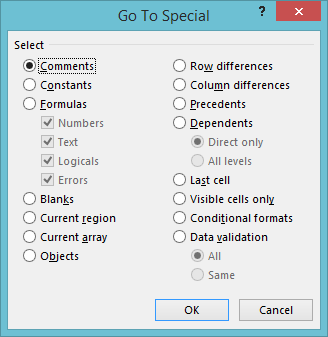
Above you can see the Go To Special window. The two options we will be using are the Current region and Blanks options but you should also note the Last cell option, great for well how can I say this …, for finding the last cell.
So what are the steps?
- Click on cell A1.
- From Go To Special choose Current region. You should note that this will only work if there are no blank rows as current region only goes as far as the first blank row. If your sheets have blank rows you will find other solution to this limitation in the full Excel VBA course online.
- Then from Go To Special choose Blanks. This should leave you with all the blank cells within your data selected. Be very careful not to click anywhere as this will deselect the cells we need!
- The next key you should type is the equals key (=) followed by the up arrow key. This places a formula into the currently active cell as putting it equal to the cell above.
- Now while holding the CTRL key press Enter. This will place the same formula into all other selected cells.
- Finally select all your data again using Current region and copy and paste values to remove the formula and leave the data only.
Don’t forget to stop recording
You should ensure now to stop recording your macro using the Stop Recording button shown below:

Running your Macro
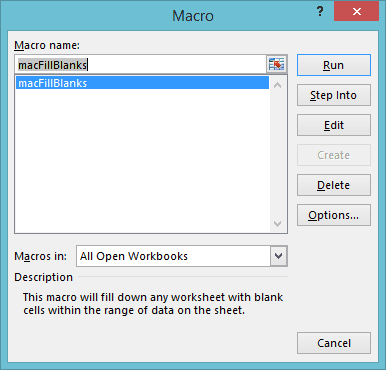
To re-run your macro select the Macros button from the Developer tab on the ribbon shown below:

This will show a window of all available macros. You can select your macro and click the Run button.
I hope this is of some help, check back regularly for more tips and tricks on using all aspects of using Excel.
Be Brilliant at Excel. Save Hours each week and add Professional Certification to Your Resume
Even Microsoft use us to teach their employees Excel
Get access to The Ultimate Excel Training Course Bundle